Subscribe to Wordpress Themes Demo
the reason I entered the multimedia majors

My name is miftakhul Huda, Just Call me Huda

Now i am a student in SMKN 2 Buduran SDA

im a 16 years old now and its my stories about why i chose Multimedia

first time i enter in multimedia. i never have an intension to join it.

but after i knew all about computer i become love it. 
losses into this direction is a matter of great expense, from all majors who are in school the most expensive is multimedia

and its profits are able to hold a computer, and create works without any restriction,
so, the most fun again, we are very respected forour great work

after graduating from school I will be working directly and if it does not work I would be a great designer of art or they called with Multimaker who have mean workers with more expertise

this expertise can make me knows all about Technology and World.

Like A Photoshop, it can make many pictures become great like a dream land but if you have ability to Design it

Its realy interesting. But it will make u Crazy if you Know No things, 

not Only thats, Many kinds of Art 

and I will be a Rich man if I have real Tallent in this Technology

So why you not join in this expertise

edit photos with photoshop avatar effects


if you have opened a picture, press CTRL + SHIFT + U so its so black and white color..or desaturate.. atau klik image> adjustment > desaturate


create new layer (Click Layer> New> Layer) and color with Blue color (color code in the image) .. consider the image in layers of black and white background already .. I had been too hehehe .. 


layer effect change it into color and opacity to be 50% 


merge those two layers are now in a new layer by pressing CTRL + SHIFT + ALT + E.. change the layer mode to color burn 


clik Image> adjustment > exposure


duplicate layer 2 by pressing CTRL + J .. Blur and add effects .. Click Filter> Blur> Gaussian blur 


create new layer (click Layer> New> layer), color with black, so the Soft Light Layer mode and opacity around 75% 


Duplicates another third layer by pressing CTRL + J .. change the layer Mode to Normal and the opacity to be 90%. 


Click the Add vector mask for masking the required area in this region face 


click the brush tool .. right click on an image and its brush settings 


colored face and neck area in the Vector mask that had been made 


Now we create a highlight in the area of the face and neck .. Create a new layer .. use the brush tool again .. .. a white foreground color kecilin his brush size .. (Approximately aja ya) .. brush like the example below. 


clik Filter > blur > gaussian blur


change the layer mode to soft light. 


Click the Add New Fill or Adjustment Layer below Layer palette. and settings such as image 


Enough of his setting his face .. Now we lalukan enlightenment and staining in the eye area .. Duplicate the Background layer (the photo was Choki Sitohang) .. duplikatan had to move the layer at the top .. 


clik Layer > Layer mask > HIDE ALL

Paint the eyes with a white


Now duplicate the background layer copy .. right click> duplicate layer

Klik Image > Adjustment > Hue/saturation

so the color of his eyes .. Ijo it is now clear that white aja .. click on the layer mask .. then colored with black color .. (White only) 


Now we make the dots on the forehead, nose and cheeks .. .. create a new layer use the brush tool small size .. white color .. click on each section that you want on the spot.


Right click the layer 6> blending option to plasticity glowing .. 


change its opacity so about 75% now create a letter using the letter AVATAR Lithos Pro .. may already exist in the windows at each

right click> blending option letters .. its layer


The results :


Comparison with the original Sitohang Choki 


Good luck .


example of how to make plurk

  • Open http://www.plurk.com on your preferred browser
        Click Sign up for free viewing
        Then fill Nickname, First Name, Last Name, Email, Password, Gender, Date Of         Birth,
        Then click Sign Up Plurk


  • example of how to make hi5


    1. Your Name : There are two columns, first column you fill your first name and last name of your second column
    2. Your Email : remember input a valid email or a really active.
    3. Create a Password : create a password, if you want to compare it with the password you have email.
    4. BirthDate : date, month and year of your birth
    To further select the REGISTER button below. If it was, lived verification via email that you input. after that, good for tourists in hi5

    example of how to create a blogger

    Step 1: List of Google

    Register yourself on Google

    Why in Google? Said taught to make a blog at blogger.com, even at Google? No one, because to get into blogger, you must have logged in google.com. 

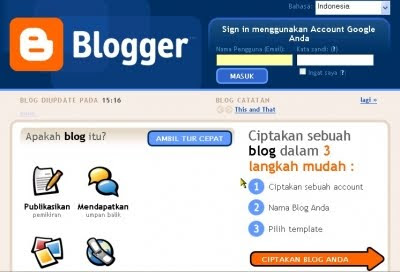
    Please visit http://www.blogger.com. You'll get a page like in the picture below .. 

    If you already have a login in Google, you stay logged in, you'll go to Control Panel or Control Panel. 

    Oh yes, you can select the language, whether Indonesian or English. 

    For this time I think you do not already have a Google login. 

    Click the big arrow that says CREATE YOUR BLOG.So far, very easy and will continue to ease. 


    Step 2: List of Blogs
    Complete Your Registration
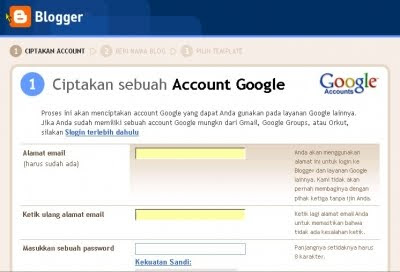
     After you click the arrow that reads big CREATE YOUR BLOG, it will emerge as the existing form in the image below.


    This process will create a Google account that you can use on other Google services. If you already have a Google account mungkn from Gmail, Google Groups, or Orkut.

    A Google account can be used to access all the facilities provided by Google.

    If you already have a google accout, you can simply log in (go). To login to Google, you must log in using your email address.
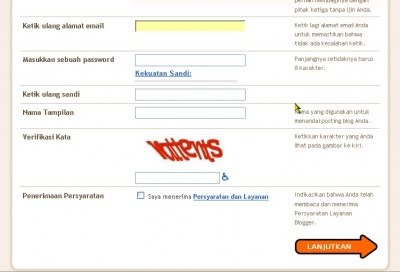
    Please complete.

    1. The email address you enter must already exist before. You'll be sent a confirmation to the email. If you use a fake email or email that the new plan will be created, then the registration may fail. You do not need to use email gmail.com. Any email can not.
    2. Complete the other data.

    3. Check "I accept the Terms and Services" as evidence that you agree. BTW you've read?

    Once complete, click the arrow that says continue.


    Step 3: Create a Blog
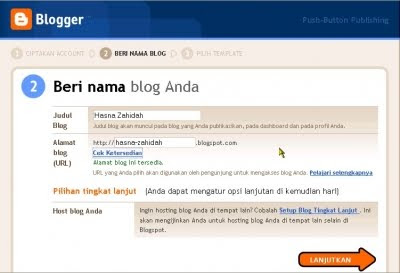
    Choosing a Blog Name and Blog URL

    If you are successful, you will be taken to a page as shown below. If it fails? Usually fail because you're wrong word verification. That is reasonable because the word verification is often difficult to read. The patient only, repeat until correct. I own up to repeat 3X. After you successfully register, you'll be taken to a page like in the picture below. Now you begin to create a blog by filling in your name and address of your blog. For example, I named the blog with the name Zahidah Hasna. Shhh, do not be suspicious, Hasna was my daughter. I chose the blog address with the address http://hasna-zahidah.blogspot.com as alaternatif, can also http://hasnazahidah.blogspot.com. If you make a lens to promote your product or affiliate products, so in choosing a name, must contain the name of the product or service that you offer. For example, if you want to sell my ebook, you can choose key words such as motivation, success, positive thinking, and other key words as appropriate. You also can examine keywords most sought-after people (of course must be related to the product you sell) on https: / / adwords.google.com / select / KeywordToolExternal You can check availability for your chosen blog address. If available you can proceed. If not available, then you have to be creative to find a different name or modify an existing address, for example added abc, xzy, 101, and can also insert your name. Continue to click the arrow labeled CONTINUE. 


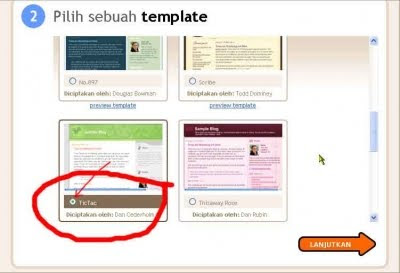
    Step 4 Blog Templates
    Choose a design according to your taste.

    Successful? Course successfully, it is easy koq. If successful, you will be redirected to a page like in the picture below.Select a theme according to your taste. If nothing is within their tastes, do not worry, I'll still many options that you can install the theme itself. Now select just the theme for the blog creation process can be completed. You can preview themes with a click of the drawing.Choosing a theme for your click (mark) o bulatannya as shown below. See what I pointed with my artificial red arrows.After that you click the arrow that reads CONTINUE 


    Learning to Make Blog finish

    example of how to create gmail

    1. address input  http://mail.google.com/ or http://gmail.com or you can also input http://google.co.id first, then click on the menu at the top of the window gmail google


    3. Then select the [create an account] or [sign up for gmail] 

    4. Then input your identity on the application form, to the steps very easy charging, and charging at almost the same dengancara email services on Yahoo.com, if the difficulty in filling because the English language form, language aja gantit lived on the upper right corner of the window form registration. Choose the language you want, 


    5. For filling the word verification, if difficult to read, could be replaced with a click on the small symbol on the right there is the word verification field. 


    6. when it filled all, just click the button [I accept, Create my account] or [I accept. Make my account] .. deh already completed

    7. to try to show emailmu, directly aja click the button [show me the account] or [I'm ready - show my account]

    example of how to make email


    1. This of course is the first step opens the browser you used it (can IE or Internet Explorer, Mozilla Fire fox, or even opera, it's up to you) ... then enter the URL address, www.mail.yahoo.com, 


    2. Notice in the picture above, if later on you have registered and want to open the email, then enter the yahoo id and paswod you, then click Sign In. But because you have not registered yet, and yet possessed yahoo Id and password of course, then you just click the Sign Up menu located at the bottom sign in the menu sometimes also at the top, just search for it with the words Sign Up or Register. 


    3. immediately after you click the Sign Up page will appear containing the registration form on yahoo email as shown below. 


    then you just enter the data yourself susuai identity column has been provided. below me give an example of how the filling 


    a. for charging the column 'email alternat' emptied just fine, or if you want to be filled with email addresses of friends who could be trusted. Because this alternative email may work if you later forget your password, the password you will be emailed to you enter your last alternative. For the choice questions, choose to live alone (already provided, so no need to make the question) and answer their own input, the function was also similar to the verification email. That is if you forget to paswod, then the question that you select this will appear, and you enter you liable for this.

    b. Enter the code capta in the field provided, enter the code that is yahoo asking as it is to maintain the security of yahoo server from spam engines. because the spam engine can not read the code capta, but only human. capta if the code hard to read, click the icon klah two curved arrows to the left of the code capta. capta code then later be turned into another form. if it is still difficult, click again to easily read.


    4. If you've filled in all, click on the yellow button labeled [create my account]

    if the field has a form you fill in correctly, then a moment later, a confirmation window will appear, as shown below. Click the Continue button to continue the process


    5. moment will then be directed to the contact entry you emai .. there must exist an incoming message from the party ... yahoo.com own content, typically welcome or enjoy,

    contoh membuat twitter


    1.Setelah kita membuka www.twitter.com langsung saja klik sign up now untuk membuat akun twitter atau mendaftar twitter.

    2.Setelah anda mengklik sign up now, anda akan diminta mengisi formulir pendaftaran twitter.

    1. Full name: Isikan nama anda
    2. Username: Isikan dengan nama panggilan,nama sebutan,atau nama alias yang anda suka atau miliki.
    3. Password: Silahkan diisi sesuai password yang dapat anda hafal. Disarankan dengan lebih dari 8 karakter dan gabungan antara huruf, angka atau berbagai karakter yang lain.
    4. Email: isikan dengan alamat email yang anda punya. Diatas digunakan contoh gmail.com.
    5. Tuliskan ulang huruf yang terdapat di kotak yang disediakan.
    6. Jika 5 langkah diatas telah dikerjakan langsung klik create my account.


    example create a facebook account

    1. first you do is to visit the address: www.facebook.com or http://facebook.com, and make sure the page that appears is like the picture above facebook page already in the Indonesian language, if you go to facebook that is still in english, Change was in Indonesian. how to look at the bottom left of the page. is there writing Indonesian. Click on the Indonesian, then after a moment the page will turn into Indonesian.


    2. if it appears like the picture on page one at the top, fill out the registration fields that are already available, please enter your full name, your email address (if not already have an email address please read the guide on how to make email, enter the password (key words would you use later to go into accoun facebook (for security create a unique password, but not easily guessed others), to memiliih gender, months of the date of birth, you simply click the small triangle sign on the right hand column, will appear later on choice. if it is filled quasi-click the Sign Up button which is green. (make sure the data is filled in correctly, thoroughly before click sign up)


    3. after you click Sign Up to you will be taken to the next page, you are prompted to enter the letters that appear above it.


    4. as in the example image below. insert in accordance with the example, uppercase letters or lowercase letters should be the same, enter the column Text in the box.jika you have trouble reading the code word shown it, you can replace it with another code. try by clicking another word or Try Different words. if it has been filled click Sign up or Sign Up. oh yes, sometimes separated by a space if the code is considered wrong, you could try writing without a space, or two words are written glued


    5. after you register or sign-ups click on the next window sepertti picture below. if you see pictures like below, you have successfully registered on facebook. so that the registration process easier on facebook, just skip this step one, dengancara click on the button [skip this step]


    6. In a second step, the information profile page will from Appear simple. like the picture below. insert name of your school, universitasmu, Nowhere and the place you work. Also picture below is an example of filling sudahsaya content. but if you do not want to fill it's Also fine. if it has been filled in click on the button [Save and continue], but if you do not want to be filled click the [Skip]


    7. on the third step, there are pages for photographs uplod. please uplod Upload photos by click. but in this article guides how to upload the photos are not described in detail. to read more detail about how to upload photos you can read articles on how to upload photos please read the alloy facebook.com how to upload images click here. so at this third step you just click the save button and proceed